Designing an A-Frame Part 3 - The Finishing Touches
Sealing up the Cabin
This post is long long long over-due and for that I’m so sorry. I know a lot of you have been looking forward to it and I’m so honored that all of you are interested enough in the design to follow along so intently. Unfortunately, life happens and I had to step away from my Substack responsibilities for a couple of months.
But goodness, does it feel good to be back.
My aim with this post is to bring the little A-Frame design home for you as a continuation of this series.
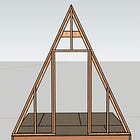
The last time I left you, we had framed the cabin. This little cabin is designed to have a fairly robust frame. I could certainly follow suit of those little cabin designs you find on Etsy that don’t really have very robust framing, but that’s not something I would feel very good about putting out into this world.
If you want to find details on how I designed the frame of this cabin, you can find parts one and two of the series here:
In this third part of the series, I’ll be covering:
My method of insulation without covering the interior rafters to achieve the iconic A-Frame exposed rafter look.
The roofing and siding materials
An Excel cost estimation sheet
Without further ado …
Keep reading with a 7-day free trial
Subscribe to Cabincore to keep reading this post and get 7 days of free access to the full post archives.


